How to Draw Denim and Jeans in Fashion Illustration: Texture, Seams, and Fades
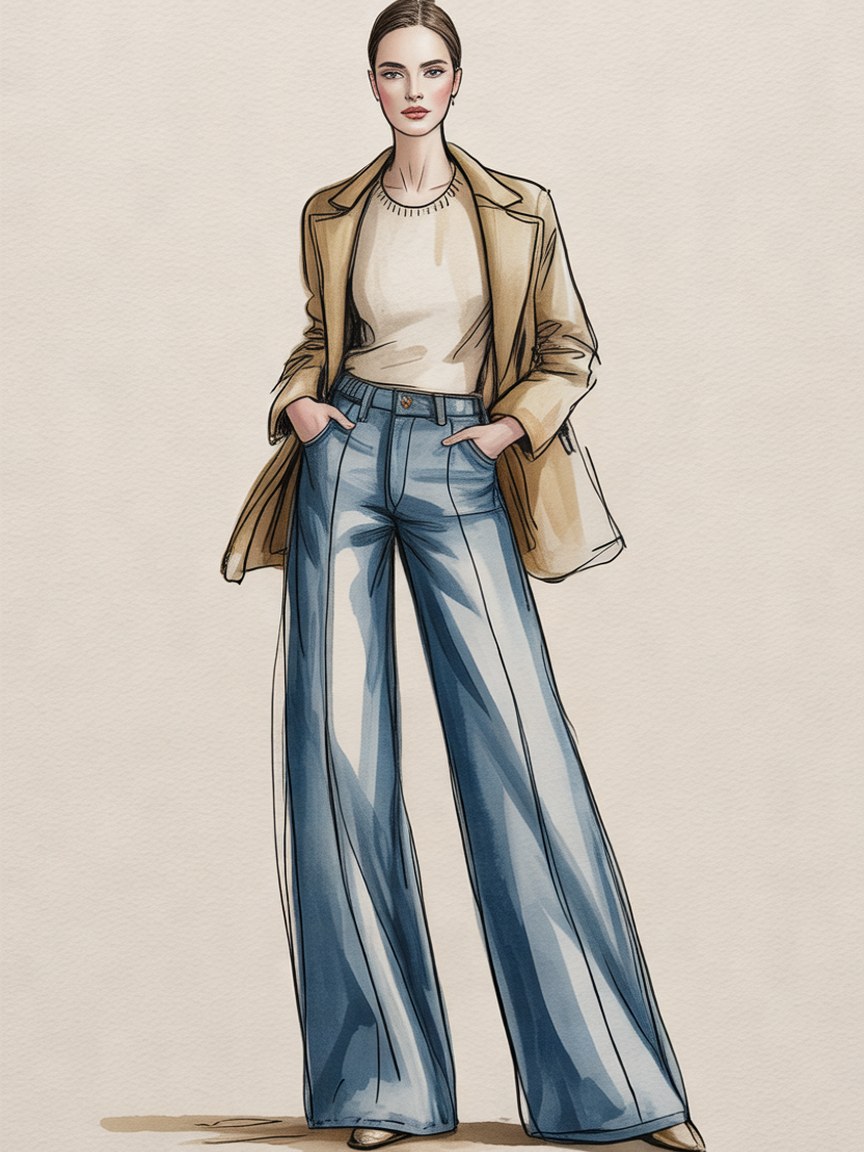
Denim is the garment everyone owns and almost nobody draws well. Jeans look easy until you try one: the fabric is heavy, the folds are sharp, the color is never just blue, and the construction details are what make it read as denim at all. Get those four things right and your jeans will look real from across the room.
Denim is a sturdy cotton twill, woven so that diagonal ribs show on the surface. It is stiff when new, soft and creased when worn, and it holds a fold far longer than a silk or a jersey. That stiffness is your biggest drawing advantage. Denim folds are predictable, and once you know where they form, you can place them with confidence.
Start with the Silhouette, Not the Texture
Before any stitching or shading, decide which cut you are drawing, because the cut controls everything else. Skinny jeans cling to the leg and wrinkle at the knee and ankle. Straight legs hang with long vertical folds. Wide-leg and flared jeans swing away from the knee and create deep columns of shadow. Boyfriend and baggy styles collapse into stacks of horizontal creases at the hem.
Build the silhouette on a solid figure first. If you are working from a croquis, our 9-head proportion guide explains where the hip, knee, and ankle should land, and the guide to fashion poses shows how weight shift changes the way a leg hangs. A jean that fights the pose will always look wrong, however good the rendering is.
Where Denim Folds Form
Jeans wrinkle in a few reliable places. Learn these and you can stop guessing:
- Crotch and upper thigh: a fan of short, tight creases radiating from the crotch seam, called whiskers when they are faded in.
- Back of the knee: a cluster of horizontal folds that points toward the knee crease.
- Front of the knee: one or two soft diagonal folds when the leg is bent.
- Ankle and hem: stacked creases where fabric collects, called stacking, heavier on longer inseams.
- Waistband: small pulls around the button and belt loops where the fabric gathers.
Draw folds with confident, angular lines rather than soft curves. Silk flows; denim bends and breaks. A fold that ends in a small sharp point reads as stiff twill, and one that ends in a smooth swirl reads as something softer.
Build Indigo in Layers
Real denim is never one flat blue. Indigo dye sits on the surface of the yarn, so the color varies with light, wear, and wash. In illustration, the most convincing approach is to build the color in three passes:
- Base wash: a light, even blue across the whole garment. Leave the paper showing where light hits hardest, such as the thighs and knees.
- Mid-tone: a deeper blue laid into the folds and along the inner leg, following the direction of the fabric.
- Deep shadow: a dark indigo, almost navy, at the deepest folds, under the waistband, and in the pocket openings.
Alcohol markers are well suited to this, because you can layer a lighter blue, then a darker one on top, and the blend creates the soft gradient that denim shows. If you are using colored pencil, work in the same order and keep a sharp point for the final shadows. For more on mixing a believable palette, see our color theory guide.
A tip for faded denim
Fades are mostly about what you leave out. Skip the mid-tone on the thighs, knees, and seat, and let the base wash stand alone. Then lift a little pigment with a blender marker or an eraser to suggest whiskers and honeycomb creasing. Overworked fades look dirty; restrained ones look worn in.
The Details That Say "Jeans"
Texture gets you part of the way. The rest comes from construction details, and these are what viewers subconsciously look for:
- Topstitching: a contrasting thread, usually gold or tan, running parallel to every major seam. Draw it as a fine dashed line, slightly inside the edge.
- Flat-felled seams: the inseam and outseam are doubled over and stitched twice. Two parallel lines of stitching make the seam read as heavy and sturdy.
- Pockets: the curved front scoop, the small coin pocket, and the back pockets with their arched stitching. Keep the shapes crisp and slightly asymmetrical.
- Rivets and button: tiny metallic dots at pocket corners and a button at the waist. A touch of metallic gold or a white highlight is enough.
- Belt loops and fly: a J-shaped stitch line on the fly and short vertical bars for belt loops.
These are the same construction details that matter in technical drawing. If you want the full production-style view of a pair of trousers, our guide to sketching fashion flats covers front and back views in depth.
Suggest the Weave Without Drawing Every Thread
You do not need to draw the twill ribs across the whole leg. A few short diagonal hatch lines, concentrated where the light catches and fading toward the shadows, are enough to tell the viewer this is a woven cotton and not a flat color. Keep them light, evenly angled, and slightly irregular. Our post on fabric textures in fashion illustration shows how the same shorthand works for tweed, corduroy, and other woven cloth.
Common Denim Mistakes
- Drawing it too light. Denim is a heavy, dark fabric. If your jeans look like pale pajamas, deepen the shadows.
- Folds that are too soft. Round, flowing folds belong to jersey. Use sharper angles.
- Missing stitching. Without topstitching, jeans look like blue trousers.
- One flat color. Always vary value and temperature. Warm the highlights a touch and cool the shadows.
- Ignoring the body underneath. Folds follow the knee, hip, and ankle. They never float on their own.
A Ten-Minute Denim Drill
Pick one pair of jeans from your own wardrobe and drop them on a chair. Draw them as they fall, with a pencil only, in ten minutes, focusing on the folds and where the creases start and stop. Then draw the same pair worn, on a croquis, in a standing pose. Comparing the two shows you exactly how the body changes the fabric. Repeat with one cut each week and you will build a library of denim shapes in your hand that no reference photo can replace.
Recommended Supplies for Drawing Denim
For Layered Indigo
Copic Sketch Markers (72-color set) include a full range of blues and a colorless blender, perfect for building and fading denim tones.
For Topstitching and Details
Sakura Pigma Micron Set (6 pens) gives you a fine tip for dashed stitching, pocket arches, and rivets.
For Colored Pencil Rendering
Prismacolor Premier Colored Pencils (72-set) let you layer indigo, add warm highlights, and sharpen the deepest folds.
For Paper That Handles Layers
Canson XL Mix Media Pad is sturdy enough for marker, pencil, and light washes without buckling.
Practice Denim on Ready-Made Figures
Our Fashion Croquis Template Sketchbook: Paris Edition gives you 300 pages of light grey 9-head figure templates with scenic Paris backgrounds. Trace the figure, then dress it in your favorite pair of jeans.
Get the Paris EditionSome links above are affiliate links. If you purchase through them, we may earn a small commission at no extra cost to you. We only recommend products we genuinely use or believe in.